Getting Started with ForgePlayer
First-time setup, from "I just downloaded this" to "video playing on my monitor and stim coming out the dongle." If you've used VLC + restim separately and want everything on one timeline, this is the path.
What you need
- A Windows / macOS / Linux machine with a working audio output
- One or more USB audio dongles if you're using stim — these are the small USB devices that show up to Windows / macOS as an audio output and feed your stim hardware (any device you'd otherwise plug into restim directly will do; technically these are USB audio DACs — Digital-to-Analog Converters)
- Optional: a second USB audio dongle for a prostate channel (Haptic 2)
- Optional: a second monitor for mirror playback
- A scene folder — see The Pack below
Install
Pick a build for your platform and run it. No Python install, no libmpv install — everything is bundled.
- forgeplayer.app — direct download buttons for Windows / macOS / Linux on the landing page.
- GitHub Releases — same builds, plus older versions and changelogs.
| Platform | File | How to run |
|---|---|---|
| Windows | ForgePlayer-windows.zip |
Unzip, double-click ForgePlayer.exe |
| macOS | ForgePlayer-macos.zip |
Unzip, open ForgePlayer.app (right-click → Open the first time, since the app isn't notarized yet) |
| Linux | ForgePlayer-linux.tar.gz |
Extract, run ForgePlayer/ForgePlayer |
The window opens with four tabs: Library, Live, Setup, Preferences.
Run from source (developers)
If you'd rather hack on the code:
- Install Python 3.11+ (3.12 or 3.13 is fine).
- Install libmpv:
- Windows: download the latest mpv build from
mpv.io/installation and place
libmpv-2.dllnext tomain.pyor anywhere onPATH. - macOS:
brew install mpv - Linux:
sudo apt-get install libmpv-dev(Debian / Ubuntu) or equivalent. - Clone and install Python deps:
- Run:
python main.py
The Pack
A "scene" is one folder containing the video, optional sibling audio files, optional funscripts (one or many), and any pinned picks. Sample layout:
my-scene/
  my-scene.mp4                                    <- main video
  my-scene[E-Stim _Popper Edit].mp3               <- pre-rendered stim audio (optional)
  my-scene.funscript                              <- main funscript (1D position track)
  my-scene.alpha.funscript                        <- explicit alpha axis (optional)
  my-scene.beta.funscript                         <- explicit beta axis (optional)
  my-scene.alpha-prostate.funscript               <- prostate channel for Haptic 2 (optional)
  my-scene.prostate.wav                           <- pre-rendered prostate audio (optional)
Drop the folder anywhere readable. ForgePlayer scans it on first Library refresh and remembers it after that.
First launch — the 60 second tour
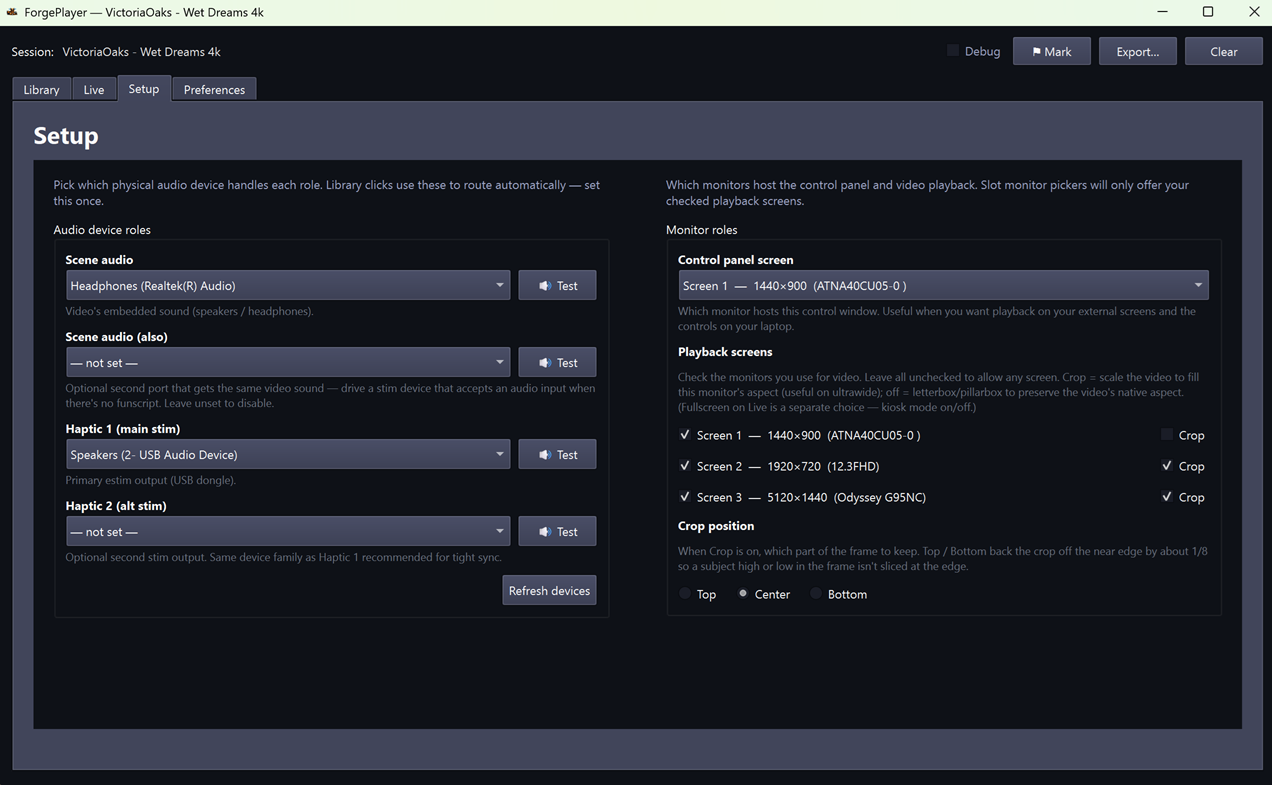
1. Pick your audio devices (Setup tab)
- Scene Audio — where the video's mp3 / mp4 audio plays. Usually your headset or speakers.
- Haptic 1 — your main stim USB dongle.
- Haptic 2 — second USB dongle for prostate, OR leave unset.
The dropdowns show every audio output Windows reports. If your dongle isn't there, plug it in and click "Refresh".
2. Choose a content preference (Preferences tab)
- Sound files (.wav / .mp3) — default, recommended. ForgePlayer plays pre-rendered stim audio when a scene ships one. No live synthesis. This is the cleanest path.
- Funscripts (live synth) — synthesizes stim from the funscript in real time (vendored restim threephase). Pick this only if your scenes ship funscripts but no stim audio file, or if you want the algorithm-tunable path.
When the preferred form isn't available for a scene, Haptic 1 falls back to the other form so you don't get silent stim.
3. Open a scene (Library tab)
- Click Refresh if the library is empty.
- Click a scene tile. A picker dialog opens listing variants: funscript sets, video variants, stim audio variants, subtitles. Pick whichever you want (defaults are sensible — the "matched" tag next to a stim audio file means it shares the scene's main stem).
- Click OK. Picks are saved per-scene and replayed automatically next time you click that tile.
4. Watch (Live tab)
- The Live tab now shows your scene loaded into the slots.
- The Output panel shows what's routing to which device:
Scene Audio → ...,Haptic 1 → ...,Haptic 2 → .... - Click Launch to open the player windows on the configured monitors. The control window stays where you have it.
- Click Play. Video plays on your monitor; stim drives Haptic 1 (and Haptic 2 if configured); audio plays on the scene-audio device.
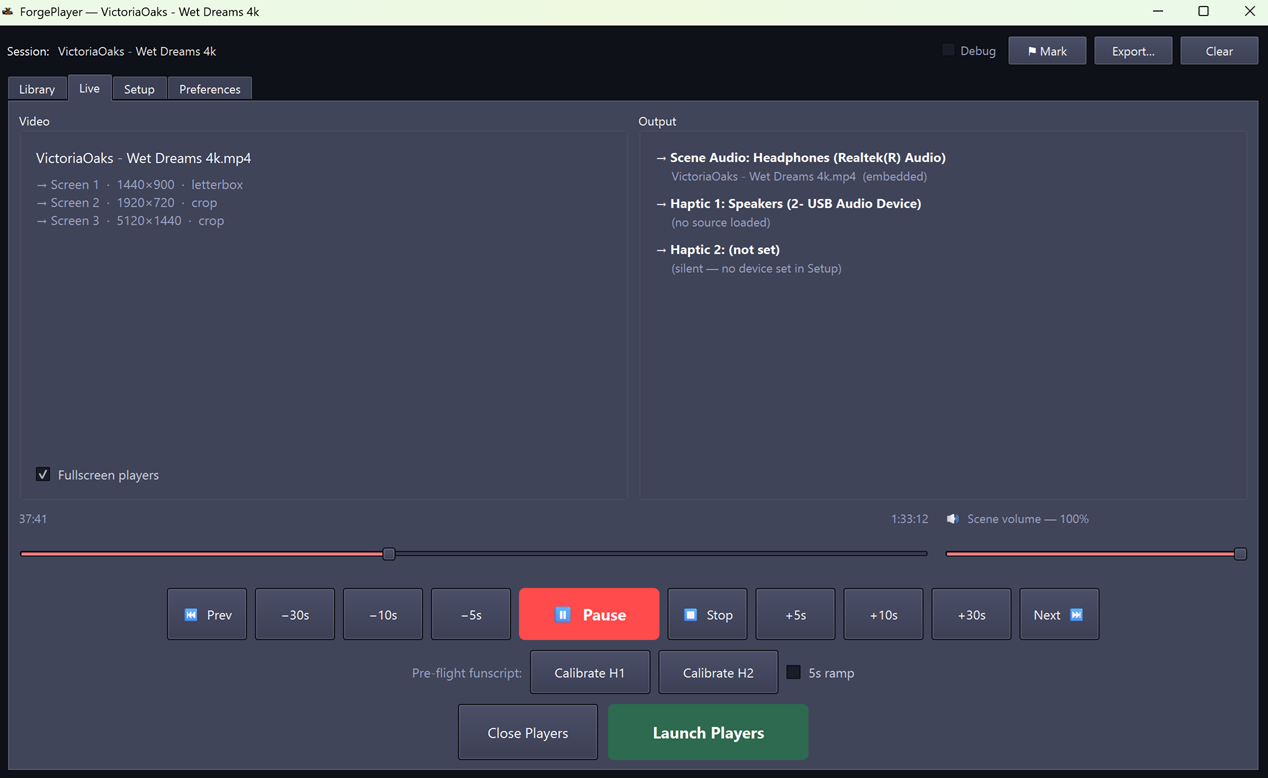
That's it. Seek with the timeline, ±5/10/30 s with the buttons, scene volume with the slider beside the timeline.
Pre-flight check: Calibrate
Before you wire yourself up, click Calibrate H1 (and H2 if you have it set). The button generates a steady test tone (not a sample of any scene audio — a synthesized continuous carrier) and sends it to the configured haptic dongle for ~30 seconds, with an optional 5 s ramp-up if the 5 s ramp checkbox is on. Use this to:
- Confirm the dongle is connected and getting signal.
- Set your levels at the dongle's physical knob before turning the body up.
- Position electrodes / pads with a steady output you can tune to.
Click the button again to stop. The test tone is identical for every scene — it's a signal-path check, not a content preview.
What "Debug" does
Top bar has a Debug toggle. When ON:
- Every UI event, every audio callback boundary, every seek, every auto-resync gets logged
- Logs stream to
~/.forgeplayer/debug-stream-<timestamp>.jsonl - The ⚑ Mark button records a timestamped marker — use it during dogfood when you hear / feel / see something weird, so the post-mortem can correlate
- Export writes a single JSON snapshot of the in-memory event buffer
Off by default; zero overhead when off.
Troubleshooting
- No sound on Haptic 1 — Setup tab, verify a device is selected. If selected and still silent: try Calibrate H1 to isolate whether the issue is wiring or playback.
- WASAPI exclusive mode warnings in stderr — the stim stream tried to grab the device exclusively (no other app can play through it while ForgePlayer runs) and failed. It auto-falls-back to shared mode. Most dongles support exclusive mode; some drivers don't.
- Multi-monitor layout looks wrong after moving the control window to a different screen — known cosmetic limitation; will be fixed post-alpha.
- Pops on close — also being chased post-alpha. Stim audio data itself is provably clean; close-pop is hardware-side.
Next steps
- User guide — feature-by-feature reference.
- BACKLOG.md (on GitHub) — what's coming next.
- docs/architecture/ (on GitHub) — internal design docs: audio-routing model, restim channel taxonomy, stim synthesis. Read these if you're hacking on the codebase.